Scan&Solve Pro - Anual - Educación
Scan&Solve™ Pro extiende el poder y la simplicidad de Scan&Solve para Rhino a estructuras multimaterial heterogéneas unidas, hechas de materiales anisotrópicos complejos como madera, laminados doblados y estructuras compuestas. Scan&Solve Pro incorpora muchas otras funciones avanzadas, incluidos varios escenarios de simulación y un diseño mejorado.
Licencia anual para Rhinoceros 6 y 7.
Recuerde que este producto es una versión educación y requiere adjuntar un carnet de estudiante, profesor o la matrícula vigente.

Scan&Solve™ La tecnología de Intact Solutions automatiza por completo la simulación estructural de sólidos de Rhino y ensamblajes unidos. A diferencia de otras herramientas de análisis, no se necesita preprocesamiento (mallado, simplificación, reparación, traducción, etc.). Simplemente seleccione el material, aplique restricciones y cargue en los modelos nativos de Rhino, y haga clic en [Go] para ver, informar, crear o imprimir en 3D los resultados de la simulación. Desde su introducción en 2011, Scan&Solve™ se ha convertido en un estándar de la industria por su simplicidad y poder de simulación estructural.
Scan&Solve™ Pro extiende el poder y la simplicidad de Scan&Solve para Rhino a estructuras multimaterial heterogéneas unidas hechas de materiales anisotrópicos complejos como madera, laminados doblados y estructuras compuestas. Scan&Solve Pro incorpora muchas otras funciones avanzadas, incluidos varios escenarios de simulación y un diseño mejorado.
Scan&Solve Pro for Rhino 6 & 7
Scan&Solve Pro presenta las siguientes mejoras sobre Scan&Solve 2014:
- Análisis de ensamblajes de componentes.
- Materiales de madera.
- Materiales ortotrópicos como compuestos reforzados con fibra.
- Interfaz optimizada
- Ayuda contextual
- Múltiples escenarios de simulación por documento
- Mucho más...
| SKU | INTACT-SCAN-EDU-1Y | ||||||||
|---|---|---|---|---|---|---|---|---|---|
| Código Producto | INTACT-SCAN-EDU-1Y | ||||||||
| EAN | 8435371403051 | ||||||||
| es_estudiante | Sí | ||||||||
| Fabricante | Intact Solutions | ||||||||
| Características |
Basic Operation:
Overview of Controls:All controls in Scan&Solve Pro are aggregated in four tabs: Scenario Selector tab for reviewing past scenarios or creating new ones, Specify Tab for setting up the analysis problem, View Tab for visualizing the computed solution, and Settings Tab for adjusting simulation parameters. Scenario Selector: If simulations have been previously run on the model, the scenario selector window pops up when you prompt SnSPro in the command line. New scenarios can be added and past scenarios can be reviewed, edited, copied, or deleted.
Watch Intact Solutions' video “Getting Started with Scan&Solve Pro Part 1: Simulation Setup” from 0:26 to learn more about the scenario selector window (find this video at 'Más information' tab).
Specify Tab:The specify tab is where the simulation setup is performed. All the tools for adding, editing, and deleting components, restraints, and loads are located on this tab.
Watch Intact Solutions' video “Getting Started with Scan&Solve Pro Part 1: Simulation Setup” from 3:31 to learn more about applying loads. Resolution:
Watch Intact Solutions' video “Getting Started with Scan&Solve Pro Part 1: Simulation Setup” from 6:46 to learn more about adjusting the resolution. Controls:
View Tab:Component Group: The components group allows selection from the available solution quantities.
Watch Intact Solutions' video “Getting Started with Scan&Solve Pro Part 2: Analyzing Results” from 2:09 to learn more about using section views. Legend Group:
Other Controls:
Settings Tab:The settings tab provides advanced controls for the simulation. To learn more about the Settings Tab, watch Intact Solutions' video “Getting Started with Scan&Solve Pro Part 1: Simulation Setup” from 7:20.
|
||||||||
| Más Información |
Descubre Scan&Solve:
Getting Started with SnS Pro Part 1: Simulation SetupLearn everything you need to know to get started with Scan&Solve Pro in this two part video series. In Part 1, learn how to setup a simulation with 5 easy steps:
Getting Started with SnS Pro Part 2: Analyzing ResultsLearn everything you need to know to get started with Scan&Solve Pro in this two part video series. In Part 2, learn how to analyze results with the many options provided, including:
|
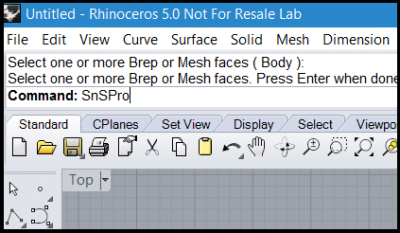
Basic Operation:
- Run Scan&Solve Pro by typing SnSPro at the Rhino command line
- Select existing scenario or create a new one
- Add components and select material
- Apply restraints
- Apply loads
- Edit simulation settings
- Click Go
- View results
Overview of Controls:
All controls in Scan&Solve Pro are aggregated in four tabs: Scenario Selector tab for reviewing past scenarios or creating new ones, Specify Tab for setting up the analysis problem, View Tab for visualizing the computed solution, and Settings Tab for adjusting simulation parameters.
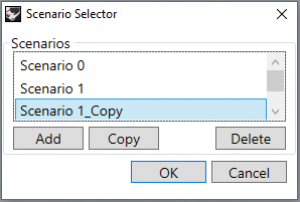
Scenario Selector:
If simulations have been previously run on the model, the scenario selector window pops up when you prompt SnSPro in the command line. New scenarios can be added and past scenarios can be reviewed, edited, copied, or deleted.
 |
|
Watch Intact Solutions' video “Getting Started with Scan&Solve Pro Part 1: Simulation Setup” from 0:26 to learn more about the scenario selector window (find this video at 'Más information' tab).
Specify Tab:
The specify tab is where the simulation setup is performed. All the tools for adding, editing, and deleting components, restraints, and loads are located on this tab.
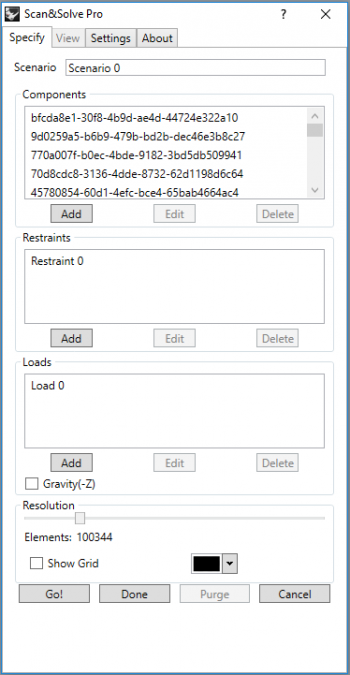 |
Components Group: Components must be closed valid solid objects in Rhino including closed solid meshes, closed valid polysurfaces, and solid extrusion objects.
Watch Intact Solutions' video “Getting Started with Scan&Solve Pro Part 1: Simulation Setup” from 1:21 to learn more about adding components and materials. Restraints Group:
Watch Intact Solutions' video “Getting Started with Scan&Solve Pro Part 1: Simulation Setup” from 2:46 to learn more about applying restraints. Loads Group:
|
Watch Intact Solutions' video “Getting Started with Scan&Solve Pro Part 1: Simulation Setup” from 3:31 to learn more about applying loads.
Resolution:
- [Slider] - adjust the slider to specify the simulation resolution.
- [Show Grid] - checkbox enables/disables display of the solution grid during simulation setup and visualization.
- [Grid Color] - button selects the color used for displaying the solution grid.
Watch Intact Solutions' video “Getting Started with Scan&Solve Pro Part 1: Simulation Setup” from 6:46 to learn more about adjusting the resolution.
Controls:
- [Go!] - begin the simulation solving process.
- [Done] - finish working with scenario, save and close SnSPro.
- [Purge] - clear solution results to save space.
- [Cancel] - exit SnSPro without saving.
View Tab:
Component Group:
The components group allows selection from the available solution quantities.
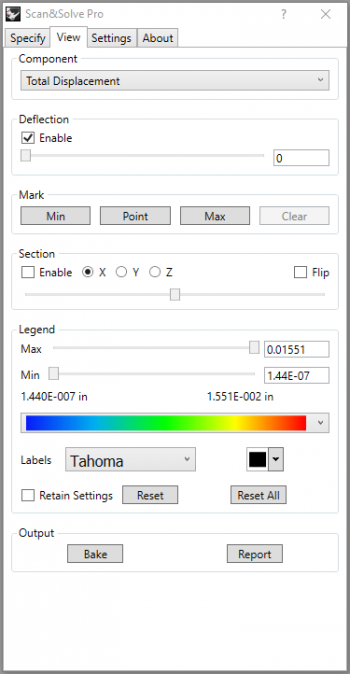 |
Deflection Group:
Watch Intact Solutions' video “Getting Started with Scan&Solve Pro Part 2: Analyzing Results” from 0:52 to learn more about using the deflection slider. Mark Group:
Watch Intact Solutions' video “Getting Started with Scan&Solve Pro Part 2: Analyzing Results” from 1:09 to learn more about the mark group. Section Group:
|
Watch Intact Solutions' video “Getting Started with Scan&Solve Pro Part 2: Analyzing Results” from 2:09 to learn more about using section views.
Legend Group:
- [Max Slider] - adjust the legend upper limit.
- [Max Edit Box] - allows entry of legend upper limit and displays.
- [Min Slider] - adjust the legend lower limit.
- [Min Edit Box] - allows entry of legend lower limit and displays.
- [Legend ComboBox] - selects the current legend color scheme.
- [Font ComboBox] - selects the font for the legend labels.
- [Color ComboBox] - selects the color for the legend labels.
- [Retain Settings] - checkbox controls whether legend settings are retained between simulations. [Reset] - button resets the legend settings to the default for the currently displayed solution component.
- [Reset All] - button resets the legend settings to the default for all the solution components.
Other Controls:
- [Bake] - bake the visualization mesh to the Rhino document or an external file. (More...)
- [Report] - generate a web-ready report of the simulation results. (More...)
Settings Tab:
The settings tab provides advanced controls for the simulation. To learn more about the Settings Tab, watch Intact Solutions' video “Getting Started with Scan&Solve Pro Part 1: Simulation Setup” from 7:20.
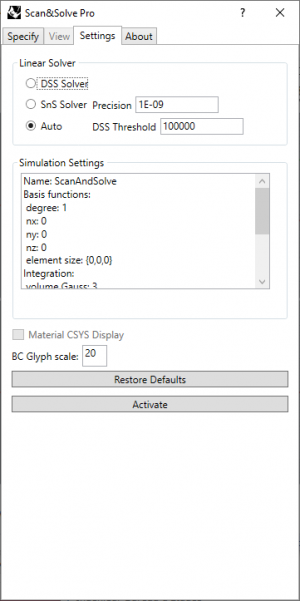 |
Linear Solver radio buttons control the linear solver used to compute the simulation results.
Precision - this value controls the relative error tolerance at which the SnS solver considers a simulation completed. Smaller values increase solution accuracy at the expense of solving time. DSS Threshold - specify the resolution value to switch to SnS Solver when under [Auto] mode. Simulation Settings Group: The current simulation settings are displayed in this listbox. Other Controls:
|
Descubre Scan&Solve:
Getting Started with SnS Pro Part 1: Simulation Setup
Learn everything you need to know to get started with Scan&Solve Pro in this two part video series. In Part 1, learn how to setup a simulation with 5 easy steps:
- Select Scenario: 0:26
- Add Components and Materials: 1:21
- Apply Restraints: 2:48
- Apply Loads: 3:32
- Set Resolution and Solver: 6:46
Getting Started with SnS Pro Part 2: Analyzing Results
Learn everything you need to know to get started with Scan&Solve Pro in this two part video series. In Part 2, learn how to analyze results with the many options provided, including:
- Deflection slider: 0:54
- Mark (Point queries): 1:11
- Section Views: 2:13
- Max/min color scale sliders: 2:31
- Viewing Tension/Compression: 3:35
- Bake geometry: 4:06
- Report: 5:24
Requisitos del sistema:
Scan&Solve Pro requiere una instalación funcional de Rhinoceros. Puede descargar una copia de evaluación de Rhino aquí. (Esta versión completamente funcional es idéntica a la versión comercial, excepto que caducará después de 90 días. Scan&Solve Pro funcionará dentro de Rhino durante este período de evaluación).
Scan&Solve Pro es una aplicación computacionalmente intensiva que requiere grandes cantidades de memoria y poder de procesamiento de la computadora. Como mínimo, se esperan 2 GB de memoria y los requisitos mínimos que necesita Rhinoceros.
Tipos de licencias de Scan & Solve:
Scan&Solve™ Pro está disponible bajo dos términos de licencia: anual y perpetua.
- Anual: Con una licencia anual, obtendrá soporte gratuito, correcciones de errores y nuevas funciones, a medida que estén disponibles.
- Perpetua: Con una licencia perpetua, obtiene soporte gratuito, correcciones de errores y nuevas funciones de forma gratuita dentro del primer año posterior a la compra.
La licencia individual permite usar Scan&Solve™ Pro en un ordenador.
Si varios usuarios van a usar el complemento en más de un ordenador, se pueden comprar licencias adicionales o licencias flotantes, póngase en contacto con el equipo de icreatia a comercial@icreatia.es para conocer los precios de las licencias flotantes o pedir un presupuesto a medida.